
Building Reusable Components with React 19 Actions
Build reusable React components with React 19 Actions using useTransition() and useOptimistic(). Learn how to track pending states, implement optimistic updates, and expose action properties for custom logic in the Next.js App Router with practical examples.

Aurora Scharff
October 28, 2025
Originally published on aurorascharff.no
React 19 Actions simplify handling pending states, errors, optimistic updates, and sequential requests. In this post, we'll explore building reusable components with React 19 Actions in the Next.js App Router. We will utilize useTransition() to track transition states, useOptimistic() to provide immediate feedback to users, and also expose an action property to support custom logic in parent components.
React 19 Actions
Per the updated React docs, Actions are functions called inside transitions. Transitions can update state and perform side effects, and the work will be done in the background without blocking user interactions on the page. All Actions inside a transition will be batched, and the component will re-render only once when the transition is completed.
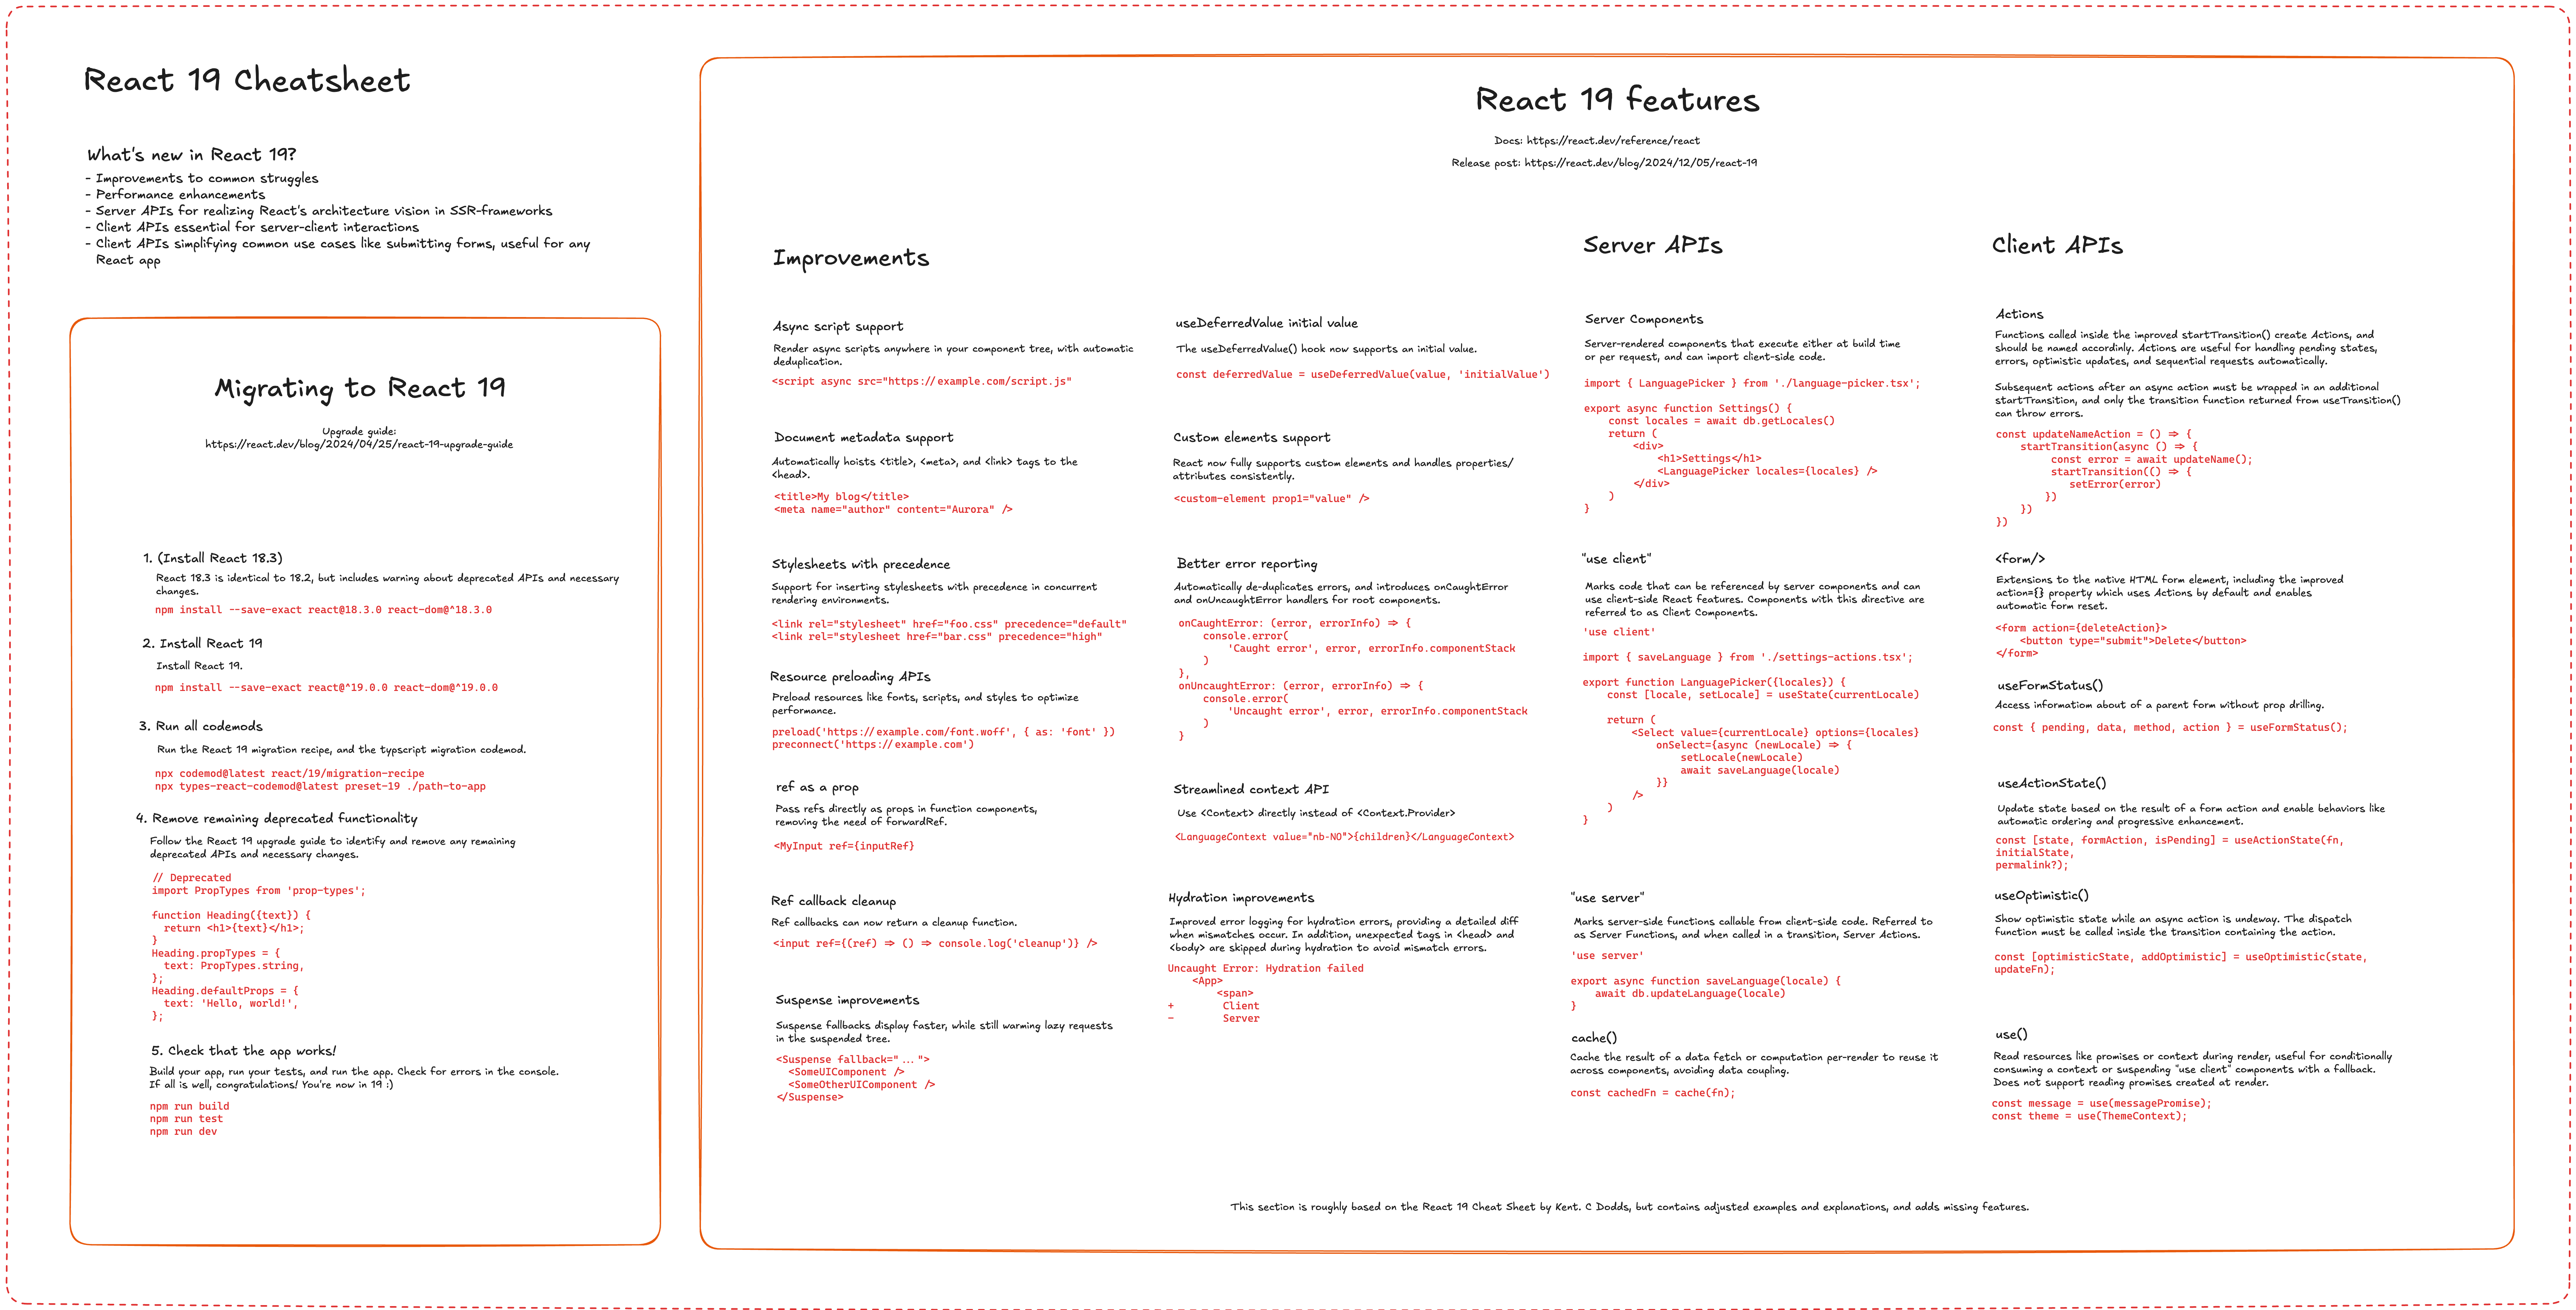
Actions are useful for handling pending states, errors, optimistic updates and sequential requests automatically. They are also created when using the <form action={} property on a React 19 form, and when passing a function to useActionState(). For a summary of these APIs, refer to my React 19 Cheatsheet or the docs.
When using the useTransition() hook, you will also get a pending state, which is a boolean that indicates whether the transition is in progress. This is useful for showing loading indicators or disabling buttons while the transition is in progress.
      const [isPending, startTransition] = useTransition();

const updateNameAction = () => {
  startTransition(async () => {
      await updateName();
  })
})
In addition, errors thrown by functions called inside the hook version of startTransition() will be caught and can be handled with error boundaries.
Action functions are an alternative to regular event handling, and therefore, should be named accordingly. If not, it will be unclear to the user of that function what sort of behavior they should be expecting.
The Use Case: RouterSelect Component
Let's say we want to build a reusable select component that will set params in the URL with the values of the select. It could look something like this:
export interface RouterSelectProps {
  name: string;
  label?: string;
  value?: string;
  options: Array<{ value: string; label: string }>;
}

export const RouterSelect = React.forwardRef<HTMLSelectElement, RouterSelectProps>(
  function Select({ name, label, value, options, ...props },
    ref
  ) {
...

return (
  <div>
    {label && <label htmlFor={name}>{label}</label>}
    <select
      ref={ref}
      id={name}
      name={name}
      value={value}
      onChange={handleChange}
      {...props}
    >
      {options.map((option) => (
        <option key={option.value} value={option.value}>
          {option.label}
        </option>
      ))}
    </select>
  </div>
  )
}
And it might handle the change like this:
      const handleChange = async (
  event: React.ChangeEvent<HTMLSelectElement>
) => {
  const newValue = event.target.value;

  // Update URL
  const url = new URL(window.location.href);
  url.searchParams.set(name, newValue);

  // Simulate a delay that would occur if the route destination is doing async work
  await new Promise((resolve) => setTimeout(resolve, 500));

  // Navigate
  router.push(url.href, { scroll: false });
};
It can be used by passing searchParams from the router:
      <RouterSelect
  name="lang"
  options={Object.entries(languages).map(([value, label]) => {
    return {
      value,
      label,
    };
  })}
  label="Language"
  value={searchParams.lang}
/>
Since we are in the Next.js App Router, when we push to the router with a delay, the value of the select is not updated until the router.push() is completed and the search params are updated.
This leads to a bad user experience, as the user has to wait for the router push to complete before they see the new value in the select. They might get confused and think that the select is not working.
Tracking the Pending State with Actions
Let's track the state of the push to the router by creating an Action with the useTransition() hook.
We wrap our push to the router in the returned startNavTransition() function, which will track the pending state of that transition. This will allow us to know when the transition is in progress and when it is completed.
          const [isNavPending, startNavTransition] = useTransition();

    const handleChange = async (
      event: React.ChangeEvent<HTMLSelectElement>
    ) => {
      const newValue = event.target.value;
      startNavTransition(async () => {
        const url = new URL(window.location.href);
        url.searchParams.set(name, newValue);

        await new Promise((resolve) => setTimeout(resolve, 500));
        router.push(url.href, { scroll: false });
      });
    };
Now, we can use the isNavPending state to display a loading indicator while the transition is in progress, and add accessibility attributes like aria-busy.
      <div>
  {label && <label htmlFor={name}>{label}</label>}
  <select
    ref={ref}
    id={name}
    name={name}
    aria-busy={isNavPending}
    value={value}
    onChange={handleChange}
    {...props}
  >
    {options.map((option) => (
      <option key={option.value} value={option.value}>
        {option.label}
      </option>
    ))}
  </select>
  {isNavPending && 'Pending nav...'}
</div>
Now, the user will get feedback about their interaction with the select, and won't think that it is not working.
However, the select is still not updating immediately.
Adding Optimistic Updates with useOptimistic()
This is where useOptimistic() comes in. It allows us to update the state immediately, while still tracking the pending state of the transition. We can call it inside the transition:
      const [optimisticValue, setOptimisticValue] = useOptimistic(value);

const handleChange = async (
  event: React.ChangeEvent<HTMLSelectElement>
) => {
  const newValue = event.target.value;
  startNavTransition(async () => {
    setOptimisticValue(newValue);
    const url = new URL(window.location.href);
    url.searchParams.set(name, newValue);

    await new Promise((resolve) => setTimeout(resolve, 500));
    router.push(url.href, { scroll: false });
  });
};
While the transition is pending, optimisticValue will be a temporary client-side state that will be used to update the select immediately. Once the transition is completed, optimisticValue will settle to the new value from the router.
Now, our select is updating immediately, and the user will see the new value in the select while the transition is in progress.
Exposing an Action Property
Let's say, as a user of RouterSelect, we want to execute additional logic when the select changes. For example, we might want to update some other state in the parent component or trigger a side effect. We can expose a function that will run on select change.
Referring to the React docs, we can expose an action property to the parent component. Again, since we are exposing an Action, we should name it accordingly, so the user of the component knows what to expect.
It could look like this:
      export interface RouterSelectProps {
  name: string;
  label?: string;
  value?: string;
  options: Array<{ value: string; label: string }>;
  setValueAction?: (value: string) => void;
}
And we can call this property inside the handleChange transition:
      const handleChange = async (
  event: React.ChangeEvent<HTMLSelectElement>
) => {
  const newValue = event.target.value;
  startNavTransition(async () => {
    setOptimisticValue(newValue);
    setValueAction?.(newValue);
    const url = new URL(window.location.href);
    url.searchParams.set(name, newValue);

    await new Promise((resolve) => setTimeout(resolve, 500));
    router.push(url.href, { scroll: false });
  });
};
Let's also accept async functions. That allows the action callback to be either synchronous or asynchronous without requiring an additional startTransition to wrap the await in the action.
      export interface RouterSelectProps {
  ...// other props
  setValueAction?: (value: string) => void | Promise<void>;
}
And then just await the action to complete before pushing to the router:
      const handleChange = async (
  event: React.ChangeEvent<HTMLSelectElement>
) => {
  const newValue = event.target.value;
  startNavTransition(async () => {
    setOptimisticValue(newValue);
    await setValueAction?.(newValue);
    ... // Push to router
  });
};
Using the Action Property in a Parent Component
Now, we can execute state updates through the setValueAction prop, and because of the naming, we know what behavior we will get.
For example, if we set a message with useState():
      const [message, setMessage] = useState('');

return (
  <>
    <div>
      Message: {message} <br />
    </div>
    <RouterSelect
      setValueAction={(value) => {
        setMessage(`You selected ${value}`);
      }}
We know that this state update will occur once the push to the router has completed.
Further, if we now want optimistic updates, we can call useOptimistic():
      const [message, setMessage] = useState('');
const [optimisticMessage, setOptimisticMessage] = useOptimistic(message);

return (
  <>
    <div>
      Message: {message} <br />
      Optimistic message: {optimisticMessage}
    </div>
    <RouterSelect
      setValueAction={(value) => {
        setOptimisticMessage(`You selected ${value}`);
        setMessage(`You selected ${value}`);
      }}
We know that this state update will occur immediately.
Here's what the final select implementation could look like:
      'use client';
...

export interface RouterSelectProps {
  name: string;
  label?: string;
  value?: string | string[];
  options: Array<{ value: string; label: string }>;
  setValueAction?: (value: string) => void | Promise<void>;
}

export const RouterSelect = React.forwardRef<HTMLSelectElement, RouterSelectProps>(
  function Select(
    { name, label, value, options, setValueAction, ...props },
    ref
  ) {
    const router = useRouter();
    const [isNavPending, startNavTransition] = React.useTransition();
    const [optimisticValue, setOptimisticValue] = React.useOptimistic(value);

    const handleChange = async (
      event: React.ChangeEvent<HTMLSelectElement>
    ) => {
      const newValue = event.target.value;
      startNavTransition(async () => {
        setOptimisticValue(newValue);
        await setValueAction?.(newValue);
        const url = new URL(window.location.href);
        url.searchParams.set(name, newValue);

        await new Promise((resolve) => setTimeout(resolve, 500));
        router.push(url.href, { scroll: false });
      });
    };

    return (
      <div>
        {label && <label htmlFor={name}>{label}</label>}
        <select
          ref={ref}
          id={name}
          name={name}
          value={optimisticValue}
          onChange={handleChange}
          {...props}
        >
          {options.map((option) => (
            <option key={option.value} value={option.value}>
              {option.label}
            </option>
          ))}
        </select>
        {isNavPending && 'Pending nav...'}
      </div>
    );
  }
);
Check out this StackBlitz for a working example.
For a more practical, real-world example of the patterns described in this post, check out the Filters.tsx component in my Next.js 15 Conferences project.
Building Complex, Reusable Components
When we are building more complex reusable components, we might run into constraints forcing us to move logic like optimistic updates to the parent.
In my case, I was playing around with this Ariakit example, where the generation of the display value has to be done outside the reusable select component. That means that we cannot call useOptimistic inside the reusable select itself. To solve it, we can expose a setValueAction prop, and then call useOptimistic() in the parent component to update the state immediately.
Which this approach, we can maintain reusability and still allow for any custom Action logic in the parent component.
Key Takeaways
- Actions are functions called inside transitions that can update state and perform side effects.
useTransition()provides a pending state to track the progress of the transition.useOptimistic()allows for immediate state updates inside transitions.- Exposing an action property to a reusable component allows for custom logic in the parent component.
- Using
useOptimistic()in the parent component allows for immediate state updates while still maintaining reusability. - The naming of actions is important to convey the expected behavior to the user of the component.
Conclusion
In this post, we explored building reusable components with React 19 Actions, tracking transition states, using optimistic updates, and exposing action properties for custom logic. We demonstrated how useTransition() provides pending states for better user feedback, how useOptimistic() enables immediate UI updates, and how exposing action properties maintains component reusability while allowing custom logic in parent components.
By following proper naming conventions for Actions and leveraging React's concurrent features, we can build components that provide smooth user experiences with minimal complexity.
Sources:
More certificates.dev articles
Get the latest news and updates on developer certifications. Content is updated regularly, so please make sure to bookmark this page or sign up to get the latest content directly in your inbox.

The First Hands-On AI Developer Certification
Discover how the AI Developer Certification measures real-world AI-assisted development through a hands-on, proctored exam. Learn what makes the certification unique, how it works, and what to expect when preorders open.

Alex Garrett-Smith
Jul 23, 2026

Nuxt Studio and What It Is
A look at Nuxt Studio, the open-source visual CMS for Nuxt Content, how it works with Git, and when it's the right fit.

Reza Baar
Jul 22, 2026

JavaScript Generators: Writing Iterators With yield
JavaScript generators explained: write lazy iterators with yield, handle infinite sequences, and skip the protocol boilerplate.

Martin Ferret
Jul 21, 2026